When I first split the player controlled ships off into AI controlled ships, I attempted to reuse and recycle as much as I had written as possible. In fact, I tried to just make a copy of the player ship and insert a new component called CPUController. That was meant to replace the already written PlayerController script, which I just disabled in the list of components in the inspector. Of course, to make the CPUController script itself, I just started by copying over the PlayerController script and changing the name.
So far, so efficient.
Unfortunately, when I fired it up (tried to build a Web Player file) it wretched and completely failed.
AAARRRGGGHH! I said. (I'm 1/8 pirate it turns out). What errors is this thing throwing?
When I looked, I couldn't see anything that made any sense.
Eventually, I figured out that I had kept a part of the code from the PlayerController that defined OnTriggerEnter() a function called when the game object enters a collider with IsTrigger set to true. When I recycled this code in the CPUController while only disabling the PlayerController, that still left two definition for the function and caused the issues I was seeing.
Too much recycling and reusing code can be a problem.
Another problem was that I was confusing disabling a component with destroying a game object.
In Unity, components are pieces of game objects. Some of them have the ability to be enabled and disabled by code. That's what I was doing to the PlayerController script on the baby AI ship.
But, it could be enabled later, and so the compiler (or whatever that part of Unity is called) still looks at it and notes what's there.
During the course of execution of a game, a game object might be instantiated (born) and destroyed (not just dead, but dead and incinerated with the ashes spread to the etheric winds of the electronic cosmos). There are warnings in multiple places in the documentation that a destroyed game object completely stops. If you have any suspended (using the "yield" keyword) scripts, they will terminate wherever they were at and never proceed if their game object is destroyed. At least I think that's what they meant.
I was confusing disabled with destroyed, and it sunk my recycling project for awhile. But, I figured it out and deleted the PlayerController entirely from the CPU controlled ships. That fixed that issue. Then, I had to realize that another part of my code was specifically calling the PlayerController. That had to be fixed with an if statement to call either the PlayerController or the CPUController depending on what kind of ship was involved.
Luckily, I had foreseen that sort of necessity, and included a variable set to either 1P, 2P, S (for shields), or CPU that I could pass to make that determination.
Thursday, March 31, 2016
Monday, March 28, 2016
Opening Seaons
First, an update on my seemingly forever ago last post. Here's what the old death sequence looked like:

Here's what the new death sequence looks like:

I still haven't fixed the engines all the way, but the overall effect is a lot better as far as giving a pause to the player that got killed, and getting rid of the shields. We've added an entrance effect and a new awesome looking star.
So, since everybody else's project had a neat opening, we put one together too. It uses the new entrance effect for the ships and the new prettier star. Here's the opening scene to Star Battles.

If I had more time, I might work it up into something better, or maybe we'll go with the scripted animation method too.
Two more posts in the not so distant future, a star tool and warping.
Friday, March 25, 2016
Let There Be Light
I created darkness levels in Penguin Pete today, upon suggestion of Tim.
This of course meant that I needed to start working with light, an area I tend to dislike in the first place. As with anything in Unity, there's a steep learning curve. Additionally, there is much less info for 2d Unity lighting, than for 3d. This made things even more... interesting.
I first needed to darken the entire scene. After a brief online read, I started out by simply adjusting the "Ambient Intensity" of the entire scene in the Lighting Window.

This seemed to work for everyone else online. But wait... it's not that simple in 2d Unity. I had been thwarted. I then began adjusting every possible control in the Lighting Window. It logically seemed to me that the """Lighting""" window should effect some aspect of the """light""" of the world.
As with most things, button-mashing doesn't fix the problem. I began another drawn out googling session. Had I not come across this random post, I would probably still be googling.
Apparently, the default Materials for all 2d sprites are not effected by light, which explains why my button mashing didn't work. Once I gave each item the correct Material, I was golden. Or black, as it were.

Now I simply needed to add a light component, and attach it to the penguin as the only light in a dark world. Interestingly, Unity's light components are designed for a 3d world, but they still effect a 2d world upon intersection.

This ended up being a problem for me. Initially, my light was not illuminating anything. It turns out that my z index was off, so my light wasn't showing on the 2d plain. Once that was adjusted, I wrote all the necessary code, and voila! Dark levels!

Additional pro tip:
I discovered this little jewel during my adventures. If you want to give your users (or yourself) chronic visual dysfunction, just turn up the ambient light setting to max level. The result is displayed below.

On the bright side (pun intended), an intense subjugation period of 30+ minutes would definitely work as effective eye bleach after coming across an especially unattractive creature of the female homosapien variety.
Wednesday, March 23, 2016
Why think when someone else can think for you?
The Elvetika Artist says:
After seeing your splahs screen, I'm thinking of stealing that parallax use for Elveteka, no programming for me though, just WYSIWYG in Flash.
It's funny how we ended with the same structure: sky, mountain, foreground. I even had a sketch with flanking trees at first!
Quick note: the title is not a slam on you 'stealing' 'my' parallax. It's a description of how I made my title.
I thought I'd go over some of the process real quick.
Monday, March 21, 2016
The Title
Spriter won't actually make the animation easier in Vargenstone's case, due to the perspective, but it may make the interaction between animation and game easier, especially now that my painting program of choice now has an experimental Spriter Exporter. Tomorrow's my day off, and I intend to spend a couple of hours tinkering with said tools to see if a) they make things more efficient and b) if the efficiency gain is sufficient to justify altering my workflow.
Meanwhile, since our Flash expert explained how he did the title for Elvetika, here's a bit on how I made the title Screen for Vargenstone:
Meanwhile, since our Flash expert explained how he did the title for Elvetika, here's a bit on how I made the title Screen for Vargenstone:
Saturday, March 19, 2016
if (900 != 900) { SomethingIsStrange(); }
Ok, I have a question for the other dev interns. I had this problem when I first started the project, but I have consistently ignored it until now.
I have set the Unity window resolution to 900px by 600px. Easy enough, right? The only problem is . . . the screen size isn't 900x600. I even took a screenshot and measured the pixels in MS paint. It's more like 1350 by 900.


I have set the Unity window resolution to 900px by 600px. Easy enough, right? The only problem is . . . the screen size isn't 900x600. I even took a screenshot and measured the pixels in MS paint. It's more like 1350 by 900.

The blue is my actual window size. You can see in the top left that it's saying my screen size is 900x600, but that's clearly false. The same thing is also occurring in the web build. It does happen to be the same ratio of width/height (3/2). So either Unity is just increasing my size by 50%, or Unity can't count, or I'm losing my mind. I've used the usual google fu abilities, but I can't find anything about this issue. Vox said he might have recalled someone else having this same problem. Assistance/explanations are greatly appreciated.
Update:
Christoph Nahr suggested changing the DPI settings, and that worked fine. I also found another quick fix for the web player. It turns out that Internet Explorer was set at a 150% zoom for some reason. I changed that back to 100%, and I'm back in business. Don't we all love IE...

Friday, March 18, 2016
It don't mean a thing if it ain't got that swing.
For a side-facing game like Elvetika or Penguin Pete, I'd draw the characters by hand and probably use Spriter to animate them. For a top-down game like Vargenstone, however, eyeballing it would make the proportions look funny, so I make quick, crappy 3D models and animate them, then draw over the models.
 Which brings us to a principle called squash and stretch, or as Pixar calls it, squetch.
Basically, a soft body squashes and stretches as it moves:
 Rocky the Dwarf isn't a very soft body, and at the frame rate I'm using, I don't need to worry about him squetching a lot.
But Buddah-Belly the Orc needs to be super squetchy, and his tumescent tummy needs to be even more squetchy than the rest of him. In addition, his ponderous paunch should exhibit secondary motion. That is, it should lag behind his body. In short, jiggle-physics.

Basically, a soft body squashes and stretches as it moves:
But Buddah-Belly the Orc needs to be super squetchy, and his tumescent tummy needs to be even more squetchy than the rest of him. In addition, his ponderous paunch should exhibit secondary motion. That is, it should lag behind his body. In short, jiggle-physics.
Thursday, March 17, 2016
Rhapsody in yellow
A fascinating interview with Toru Iwatani about what went right and what went wrong in designing and developing Pac-man:
Unlike the large-scale projects most developers work on today, our team consisted of a mere five members, so it was easy to control workflow. Communication problems and team chemistry were not an issue, since we were all so close. In order to effectively manage a large project, everyone on the team needs to think somewhat along the same lines—to work toward a common goal.If there is one thing I have learned to prioritize in 25 years in the game industry, it is communication. When in doubt, communicate! Never, ever, leave your team members in the dark. Even if you're busy, even if you have nothing new to report, even if you're feeling guilty or ashamed that you haven't completed something on schedule, communicate!
If you leave out the communication aspect, your team will fall apart. The process of making games today is much more complicated than it was in the Pac-Man days, so we were able to thrive with a very lean development team.
Sunday, March 13, 2016
It ain't cheatin' if it works...
So, I was bug stomping in Space Battles the other day, and I realized that I was wasting time and effort. The problem I was working on was with our respawning. After being killed, ships were originally set to just immediately jump to a new, random location and update the score. But, this looks a little odd when the explosion of the ship is still going on and the ship has reappeared already. I also had some issues where I wasn't resetting the shields correctly. You could fly into the planet/star, die, and reappear with your shields at the exact same strength they were before you death-by-planet'ed. D'oh. You can see the problems in this gif. (I messed with the frame rate and added some key frames to exaggerate the spots where the problems happen. Also, some of the art is placeholder stuff...)

So, I was working at putting in a little delay and resetting the shield parameters to their starting values, but I was having problems. I got the shields fixed and I figured out to move my respawning code into a separate function from where I turned off the Sprite Renderer component of the ship, so I could call the respawner as a "coroutine." Coroutines are simply functions that make use of the "yield" keyword. Basically, when the script hits the "yield" keyword, it pauses executing that script and returns to the rest of whatever function called it for the rest of that update. You can then use WaitForSeconds(waitTime) to cause the coroutine to wait for waitTime seconds until it resumes execution.
But, my ships engine particle systems were still playing after the Sprite Renderer was disabled. Of course, this makes total sense because the particle systems are set up as separate child game objects of the parent ship. Now, I spent a good long while and many attempts to turn off the particle systems when the ship was killed. For whatever reason, the my initial guesses were coming up empty.
Finally, I realized it wasn't cheating if it worked. It might be silly that I couldn't quickly and easily turn off the particle systems, but I didn't need to. All I needed to do was turn off the player controller script and move the ship off the screen the instant it was killed. Then, it wouldn't be able to shoot or fire its engines until it was moved to its new spawn point and its player controller was turned back on.
I could also get rid of the annoying velocity carryover (see how the ships keep moving the same direction they were before they respawned in the gif) by setting the Rigidbody2D.drag variable to a really high number like a billion (fine, 1000 in actuality) while the ship was out of sight.
By the way, I'm fairly certain that I couldn't solve the problem by disabling the entire ship game object because I think that would stop the execution of the coroutine that was called by a component of the ship. I might be wrong though, I've only been doing this for a month or so...
I'll put together a gif of the new respawning and update this post when I get the chance. By the way, the white bars on the top and bottom of the gif are from Sketchbook Pro 7 where I used the flipbook feature to create my gif. Didn't know I could do that until I tried it. Fun times.
Saturday, March 12, 2016
The magic of the background image
Tim recently sent me the background image for Penguin Pete. I find the results to be greatly satisfying. After hours of staring monotonously at the same placeholder background for hours on end, I find the change in visual appeal to be quite pleasurable.


One drag-and-drop has never done so much for me. This minor change immensely helps me to better envision the end result of the game. There's plenty of work still to be completed, but this feels like a large step toward the finalization of Penguin Pete.


One drag-and-drop has never done so much for me. This minor change immensely helps me to better envision the end result of the game. There's plenty of work still to be completed, but this feels like a large step toward the finalization of Penguin Pete.
Friday, March 11, 2016
Flashing a splash screen
The idea for Elveteka's splash screen was doing something similar to the original Karateka: a text introduction, an initial cut-scene showing the princess being handled to her prison, the title, a shot of the villain's fortress and fade to our hero climbing the cliff where the game starts.
The first part: the intro text and the cut-scene would probably be easier to do in Unity, as they share the same view, elements and movements as the main game.

 The
splash screen per se was a bit trickier, the plan was to pan the view
down from the sky to the villain's castle and add some lightning
flash to the sky, to make it more dramatic. Animating a strobe light
requires a lot of fiddling with the timeline, with the lightning
appearing and disappearing a lot in a short amount of time, and I
wasn't sure doing that in Unity or Photoshop was going to be easy.
The
splash screen per se was a bit trickier, the plan was to pan the view
down from the sky to the villain's castle and add some lightning
flash to the sky, to make it more dramatic. Animating a strobe light
requires a lot of fiddling with the timeline, with the lightning
appearing and disappearing a lot in a short amount of time, and I
wasn't sure doing that in Unity or Photoshop was going to be easy.
So
I turned to Flash, which was perfect for the job. The only problem
was that it had been some years without using it and had forgotten a
lot of its use, but if I managed to keep out of actionscript and
interactive elements everything would be fine.
The first videos of
this
playlist are a straightforward introduction of the basics in
Flash and were enough to refresh my memory.
Here's
a very succinct summary of what I did:
Preparing and importing the assets

The first thing was saving as separate images all the different elements that required any kind of animation, being that movement or any color or alpha change. In my case: the main illustration, the foreboding head of the main villain that was going to loom over the fortress, the lightning, the title, and a bluish, high contrast version of the main illustration.
After
that I just click-and-dragged them to the Stage. Easy!
Turning everything into a symbol
In Flash everything that is going to have any sort of animation needs to be a symbol. So the next step was to right click on every image in the stage, choose “Convert to Symbol” and delete them.
All imported assets are kept in the Library tab even when deleted in the Stage. As a matter of fact, the assets can also be dragged directly to the Library, instead of the stage.

Deciding what goes into what
Symbols can reside inside other symbols and have nested animations within them. A very powerful feature which is a bit of a headache when you are learning Flash for the first time.

Probably the part that required more thinking was planning how the elements needed to be nested. I finally grouped everything but the title in a single symbol that moved upwards, so in the screen showed as a downwards panning shot.
Within
that symbol there was an animation of the storm, which was just the
lightning, villain's face and blue version of the landscape changing
alpha through time.
The
single element outside that main symbol was the “Elveteka” title
which appeared a bit after the vertical panning shot was over. More
alpha modification, this one very simple.
I'm
still toying with the idea of doing the initial cut-scene with Flash
too. The animation and the changing of frames of the characters would
probably be the most tricky and arduous part, but it's probably worth
a shot.
Thursday, March 10, 2016
A game that never was
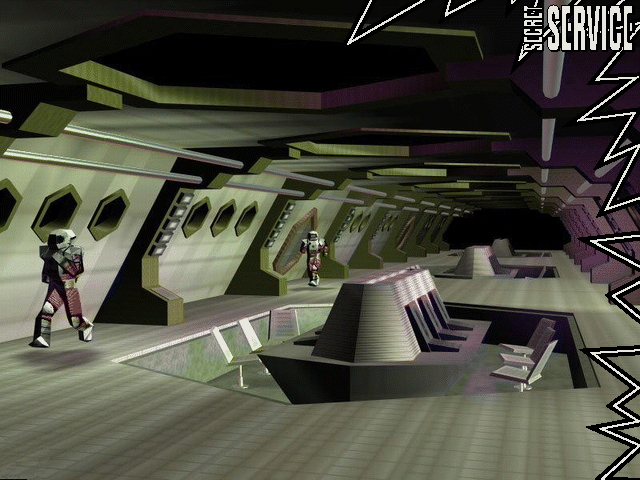
A Russian fan dug out an old preview of Rebel Moon Revolution from a Polish magazine called Secret Service:
As it happens, Rebel Moon Revolution was doomed from the moment that we signed with GT. But that doesn't mean that we couldn't have made different choices that might have allowed the game to survive the implosion of the publisher.
Games being shown lately are not entirely original. They are usually more clones of Command & Conquer or Quake. No different is the game freshly announced by GT Interactive on Friday, Rebel Moon Revolution, which will expand the circle of FPS:Sadly, that never happened, as GT Interactive imploded and took down Fenris Wolf with it. A few screen shots remain, including this one of a rescue mission. One thing important to understand about game development is that for every game that is ever finished and shipped, there are probably ten more that fail at some step of the process from initial conception to what we used to call gold master.
Rebel Moon Revolution is the third part of the successful Rebel Moon series, although in this case the title is to be fully adequate to what we see on the monitors. First of all, the game will be based on the new graphic engine, which according to the developers will be able to easily compete with the Quake 2 engine. In general, the people in the RMR in the statements repeatedly compare their work with the boys from ID Software, claiming that their project will be qualitatively similar to the king, and in some respects, even better! Hard to believe, but hopefully it will be.
However, not graphics, and the layer itself merits a place in the forefront of RMR games of this genre. This time we will no longer participate in the senseless butchery, where we murdered everything all around, not knowing who were victims, and what otherwise. The RMR this issue will be explained at the beginning of the game by using eye-catching intros. Not only that, all missions will be linked for each thread feature, which in the opinion of the authors will allow for a better empathy in the form of a hero. Levels to beat will be about 16, perfectly designed and divided into squad action. On each board has a swarm of opponents who use excellent artificial intelligence algorithms written specifically for the game. To make the player's chances more equal, the player will be able to benefit from the impressive arsenal of weapons: grenades, mines, machine guns, lasers and plasma.
RMR promises to be a great title, and if the producers fulfill their promises, they will undoubtedly make a name for themselves.
As it happens, Rebel Moon Revolution was doomed from the moment that we signed with GT. But that doesn't mean that we couldn't have made different choices that might have allowed the game to survive the implosion of the publisher.
Wednesday, March 9, 2016
Build the wall!
This is me working on the tiles for Vargenstone as a quasi tutorial on digitally painting tiles. It's more of a software recommendation than a tutorial, really.
There is a second part in the works. This is a picture of the first tile made in part 2:

There is a second part in the works. This is a picture of the first tile made in part 2:

One thing I'm learning from this project is that everything takes longer than I expect. I figured this would take me an hour or so.
It definitely went with 'Or so'. I've been at this almost three hours.
Here's a tutorial someone else wrote on making good tiles for a game, using Metroid Fusion as an example.
Tuesday, March 8, 2016
Network? We don’t need no stinking network…
As Star Battles was originally envisioned by our illustrious
Dear Leader, it was going to be a networked 3-on-3 dogfight free-for-all of
hyphenated awesome-sauce with in app purchase of upgrades and powerups to help
you smash your friends and enemies.
With such an inspiring vision dancing before our eyes, we couldn’t help
but dive into the project and go in search of networked gaming knowledge.
It turns out there is actually a terrific little tutorial
tucked away in the Unity documentation in the Unity Manual's Networking section. We used this to give our little space
shooter some booster rockets and get it off the ground. Then, our illustrious Dear Leader
informed us that the vision had changed.
Networking was out on our target platform. Oh noes!!!! We
should cry! But, no! Have no fear, Unity’s awesomeness
shines through again!
You see, that networking tutorial actually stepped through putting
together a basic UN-NETWORKED shooter game before it added the networking stuff
on top of it! We could actually go
right back to the same tutorial we’d used to make the networked game, and
skipping the network specific parts, create a nice little starter shooter
game.
Obviously, we were adapting it as we went. For example, SB uses rockets as the
primary weapon, so instead of the “bullets” that the tutorial instantiates and
just sets a velocity for, we instantiate an object that has AddRelativeForce()
called on it. This allows the
rockets to interact correctly with the gravity well in the middle of the game
space.
As an additional bonus for us, this tutorial was in UnityScript (a Unity specific form of JavaScript) instead of the more common C#. Neither of the programmers on SB are familiar with C#. Though, after a couple of debugging nightmares related to JavaScripts loose handling of types and my own ignorance, I'm awfully tempted to start learning C#. (The Unity Scripting Reference can be viewed in either JavaScript or C# by selecting an option on the webpage, BUT the Unity Manual can't. There were a couple of times that I wished this was not so, but alas...)
This tutorial was where we figured out how to handle health and damage. I think we even still have the same script name of "Combat," though the script has more bits and pieces to it now in SB to handle things like "Death By Planet" and the like.
Unfortunately, the Network Section tutorial's example UI used some older code that smelled funny. So, our UI to track health and display it came from video tutorials and a really helpful YouTube video. That YouTube video was especially funny because the guy making it actually took about four minutes while he was recording the video to figure out the problem we were actually having with our health bar. He set it up and tested it, and then paused for a moment as it didn't work. Then I watched him run through the first two or three things I'd tried to fix it. I was a little worried. Then he moved on to stuff I hadn't tried and didn't know about, and my hope increased. Then, he did something that seemed to work. So, I did it in my code and editor. And, boom! Health bar shrank as health decreased. Thanks, xOctomanx! Awesome logo, by the way.
Unfortunately, the Network Section tutorial's example UI used some older code that smelled funny. So, our UI to track health and display it came from video tutorials and a really helpful YouTube video. That YouTube video was especially funny because the guy making it actually took about four minutes while he was recording the video to figure out the problem we were actually having with our health bar. He set it up and tested it, and then paused for a moment as it didn't work. Then I watched him run through the first two or three things I'd tried to fix it. I was a little worried. Then he moved on to stuff I hadn't tried and didn't know about, and my hope increased. Then, he did something that seemed to work. So, I did it in my code and editor. And, boom! Health bar shrank as health decreased. Thanks, xOctomanx! Awesome logo, by the way.
Then, we stole that code and method for the laser weapon energy and the shield strength (two optional weapons that players can eventually get in SB). Right now, our UI looks kind of like obscure European flags with three stripes of color stacked behind the text, but it works!
More Title!

My digital painting skills are improving, but they're still not terrific.
There is more to this title than a still image can show, though. There is parallax. And fading. Other things need to fade. I should also redo the trees to allow more parallax. And maybe I should just remove the pencils.
In any case, I think I shall take a short break from the title screen. I think my programmer would like an orc. A nice, waddling orc. Yes. That is exactly what he wants.
Ah, yes. Thomas Davidsmeier left me a nice comment. Like so:
Third time I've tried to leave this comment. I'm not exactly covering myself with technical glory here.I am replying to you in a blog post because I gave up after three tries. I'm incapable of admitting my own shortcomings, so I'm going to blame Blogger for this.
The point I've tried to make twice before was that I thought the posture of the wolf head might look better if you tip it back and pin the ears back against the "neck."In short, a 'howling at the moon' pose. I agree. It would even be more 'krag' -like. But I also wanted the road to go into the wolf's mouth, with the teeth being plausibly (just barely plausibly) stalactites and stalagmites.
I'm still not sure I can't get the effect I want with the howling pose. But painting that foreground was a day's work (I am not, as I have said, the best of painters), so I'm going to add 'trying different poses' to the 'do if there's time after everything essential is done' list. Unless our Fearless Leader says otherwise.
Monday, March 7, 2016
Pushing through to the starting line
Unity is an excellent engine for game development. It is powerful, flexible, intuitive, well-documented, and widely-used. Just as importantly, it is free to use and free to publish with if you're an independent or small-time game developer.
It also has a very steep learning curve. This is not because Unity is particularly difficult to wrap your head around, but rather because of the sheer amount of knowledge that must be absorbed. I started DevGame with extensive experience in both programming and game modding, so I wasn't entirely a fish out of water, but I was unfamiliar with both the environment and the association of particular tools with particular tasks.
The way I initially got started with game modding is by taking an existing level from a game and seeing how I could modify it. I highly recommend this approach if you know what you're trying to figure out and you can find something approximately similar. Start by tweaking minor details: flags, properties, attributes, and even scripting if the level uses it. From there, identify the various building blocks that the level is composed of, and see if you can use those building blocks to make something new. Eventually, you'll be writing your own levels from scratch.
Krag Vargenstone didn't lend itself well to this approach, however. I therefore used a strategy of blasting through the Unity video tutorials and searching for any text-based tutorials I could find online. This can be just as effective as the above method, but it can take much longer, as video tutorials are not a very time-efficient way to learn new information. I found myself watching a lot of the videos on 1.25x or 1.5x speed.
As mentioned earlier on this blog, the Roll-A-Ball tutorial is the recommended starting point for new Unity users and is an excellent introduction, though it does not cover the 2D techniques used in Krag Vargenstone. The UFO Game tutorial is the 2D equivalent, as it's basically building Roll-A-Ball all over again in 2D, but it can still be useful to do them both. First, because UFO Game describes several topics implicitly while Roll-A-Ball describes them explicitly; second, because UFO Game condenses certain details while Roll-A-Ball enumerates them step-by-step; and third, because going through an unfamiliar exercise twice is better than doing it once. On the other hand, if you have no intention of using the 3D features and don't want to spend the extra time doing Roll-A-Ball, feel free to skip it and save yourself the detour.
One very important thing for new users to keep in mind is that Unity does not play well with source control out of the box. This page does a good job of covering the various peculiarities and describes how to fix them for Git. (Be advised that it was written for Unity 4; the only difference for Unity 5 is that the Version Control -> Mode option should be set to "Visible Meta Files".) For Subversion, the process is similar but shorter. This page on the Unity site has a quick nine-step procedure, but you should still read the first article to gain a full appreciation of the problem. In any case, all of the DevGame projects are using Git.
Since I develop on Windows, I also had to edit the template text file line endings from LF to CRLF as described in the aforementioned Git article. Since these template files reside under Program Files (x86), it was necessary to launch the text editor - in my case Notepad++ - as an administrator. In Notepad++, I then had to run Edit -> EOL Conversion -> Windows Format on every file in the ScriptTemplates folder.
As an aside, I enjoyed figuring out that the name Krag Vargenstone was not chosen arbitrarily. See if you too can figure out why.
Saturday, March 5, 2016
Light Infantry Game Developers
Modern light infantry is lethal. They are the fighters who win wars in this 4thGeneration of War as described by William S. Lind. They are mobile, adaptable, and always ready to seize the
initiative from their more rigid enemies.
I was so very happy to find out that our DevGame projects
were designed to get us developing a game the way light infantry fights. Instead of being handed a design doc
that specified every bit of minutia and being expected to follow it with religious
fervor, we were give goals to achieve.
My group was told to make a modern version of the ancient
computer game “Spacewar!,” and make it a network game for 3 vs 3 dogfights. That was basically all the instruction
we were given. Don’t get me wrong,
we’d already had a few sessions of the course and discussed all sorts of game
design concepts. We’d heard from
game industry professionals.
Surely we were ready to dive in and give it a try, right?
Well, that didn’t make us feel comfortable as we started. Neither I nor the other programmer on
the project had ever programmed in Unity.
(Getting up to speed on Unity deserves a bunch of posts, and I hope I or
one of the programmers will have the time to do it justice.) I’ve never
made a fully functional game. And,
the whole team has all sorts of other time commitments that would have to take
priority.
Light infantry are trained to get used to the uncomfortable
feeling of the unknown. They are
taught to thrive on it when others fall apart, even using it as a weapon
against troops that are trained to know what to expect all the time. I’m getting the feeling that being a
successful game designer or producer requires the same sort of immunity to the
unknown.
More work on the Title

But it is well and truly started.
Friday, March 4, 2016
When God closes a door, punch a hole in the wall.
My adventures as an artist continue.
So here's the graphical thingy I did today:

Git wouldn’t let me push the repo onto GitLab and then pull it to my laptop, so I didn’t have anything to work on while on my breaks. Git is a git.
So I spent that time coming up with a way to make a quick and dirty Orcish.
- Transliterate English words into a set of nasty-wasty Orc-sounding phonemes. E.g “dwarf” → “dvorv”
- Invert the order of the phonemes. “dvorv” → “vrovd”
- Clean up any awkward bits. “vrovd” → “vrov”
- Arrange words according to a grammar that is an unholy hybrid of Japanese and Cornish.
Here are some sample phrases:
“I smell a dwarf!” → “Dža vrov dremz!”
“Aren’t you a little short for a Red Claw?” → “Už tov Derválk trož ma xon?”
“This is not the dwarf you’re looking for.” → “Zyd tov už küd vrov matán.”Friends of a mystical bent have often told me that whenever God closes a door, He opens a window. Given, however, that God's first recorded command was "Make babies and take over the world!" I believe that when God closes a door, it's an invitation to make a window. That sort of attitude seems more in line with the "take over the world" directive. Was a hackish excuse for a fantasy language the best window to make? Probably not. But a window it is.
So here's the graphical thingy I did today:

DEVGAME in Develop
It was great to see an article about the DevGame game development course in the Develop Magazine GDC issue. Develop is one of the best magazines in the game industry. I've read it for years, I've contributed to it, and I highly recommend it to everyone who either works in the industry or is interested in doing so.

It's a nice article and I hope that many budding game developers will see it and consider taking the course. But I have to admit, I would have preferred it if, instead of wasting space with a picture of me, they had utilized a screen shot of one of the games being developed by the attendees, such as Elveteka, which is an updated fantasy remake of the Apple II classic Karateka.

The current DEVGAME session features five attendee projects:
Several of those working on the projects will be contributing to this blog and discussing some of the things they've learned in both the course proper and from their hands-on experience of working as part of a dev team. In addition to the attendee projects, one of the attendees was accepted as an intern on Game Brain, which is a game trivia game currently in development with Alpenwolf.

It's a nice article and I hope that many budding game developers will see it and consider taking the course. But I have to admit, I would have preferred it if, instead of wasting space with a picture of me, they had utilized a screen shot of one of the games being developed by the attendees, such as Elveteka, which is an updated fantasy remake of the Apple II classic Karateka.
The current DEVGAME session features five attendee projects:
- Elveteka
- Star Battles
- Krag Vargenstone
- G-Strike
- Penguin Pete: The Fastest Snowball at the South Pole
Several of those working on the projects will be contributing to this blog and discussing some of the things they've learned in both the course proper and from their hands-on experience of working as part of a dev team. In addition to the attendee projects, one of the attendees was accepted as an intern on Game Brain, which is a game trivia game currently in development with Alpenwolf.
Thursday, March 3, 2016
Motivation and the Artist's Ego
Hi all. I've made one or two games before, none of which were publishable, but all of which taught me a valuable lesson:
You always hit a wall.
Okay, maybe I shouldn't generalize that. I always hit a wall. Success in game dev, or anything really, is based on my ability to either surmount the wall, or else incorporate it into my schemes.
I'm tracking my work as a Devgame intern on my blog. Today, I documented some ways I surmounted the wall:
 After following my own excellent advice, I proceeded to write my own sprite packer. Um. It's terrible. Nobody but me should use it.
 Anyhow, I'm going to be tracking my progress here as well as there. Cheers.
You always hit a wall.
Okay, maybe I shouldn't generalize that. I always hit a wall. Success in game dev, or anything really, is based on my ability to either surmount the wall, or else incorporate it into my schemes.
I'm tracking my work as a Devgame intern on my blog. Today, I documented some ways I surmounted the wall:
...on regaining momentum. I have found that there are three things that lead to increasing and maintaining my momentum.
The first is to brainstorm up the smallest possible task I can do and do that. Small motion begets larger motion.
The second is to show my work. I’m an artist. I’m egotistical. I welcome the incoming adulation.

I’m not attending Devgame because I want to do art for games. I’m attending Devgame because I want to design games. If I can’t hack it, then I’d love to make a living making games in some other role anyway, but I learned the art side of things for the same reason I learned how to code: the artist’s catch 22.
It works like this: if you are a writer, cartoonist, or whatever, nobody will publish you until you’re a known quantity. And you aren’t a known quantity until you’ve been published.
When I first booted up Super Mario World on the SNES and realized that this was what I wanted to do, I assumed that game design was like all the other arts. Nobody will produce one of your designs until you’ve designed something that has been produced. And since I’m poor as a churchmouse, and can’t outright hire people to produce stuff for me, I assumed I would have to do everything myself.
Thus, I am a third-rate artist and a fourth-rate code-monkey. And please, don’t mistake that statement for humility. Third and fourth rate are still a hell of a lot better than average.

The art of imitative design
An article written for Develop that came about as a consequence of the third session of the course, on game design, entitled The Art of Imitative Design.
It is often easy to understand why a game fails, but it is usually more difficult to ascertain why one game becomes a hit when another does not, epecially when the hit does not feature better features, prettier art, faster performance, or a more distinctive brand than other games in the same genre.Read the rest at Develop.
In most cases, success comes down to superior game design, by which I mean the use of game concepts and mechanics that provide the player with a more enjoyable gameplay experience. Game design should never be confused with game development or with production, as it is the aspect of game development that consists of conceiving and articulating ideas that are subsequently turned into functional reality through the process of production.
There are four types of game design:
While most discussion of game design revolves around its highest form – original design – the fact is that very few game designers will ever rise to the level of a Sid Meier, a Will Wright, or a Peter Molyneux. Most successful games – and most good games – involve either evolutionary or synthetic design. And the reality is that most games that are developed and released are best characterised as the lowest form of game design, imitative design.
- Original
- Evolutionary
- Synthetic
- Imitative
Subscribe to:
Posts (Atom)